
Product Overview
The Bestway Sand Filter Pump provides efficient water filtration for above-ground pools, ensuring clear and clean water with its robust design and multi-function control valve for optimal performance.
1.1 Key Features of the Bestway Sand Filter Pump
- Operating pressure: 0.84Bar (12 PSI), with a maximum water temperature of 35°C.
- Requires 20 silica sand (size 0.45-0.85mm) with a capacity of approximately 18 kg.
- Features a multi-function control valve for easy operation, including backwash and rinse functions.
- Designed for above-ground storable pools, ensuring efficient filtration and clear water.
- Compact and user-friendly design with a powerful pump for optimal performance.
1.2 Benefits of Using a Sand Filter Pump
The Bestway Sand Filter Pump offers numerous benefits, including improved water clarity and reduced maintenance compared to traditional cartridge filters. It ensures healthier swimming conditions by effectively removing dirt and debris. The multi-function control valve simplifies operations like backwashing and rinsing, making maintenance straightforward. Additionally, its robust design and efficient filtration system extend the lifespan of the pump while providing consistent performance. This eco-friendly option is cost-effective and ideal for above-ground pools, ensuring a cleaner and safer swimming environment for users.
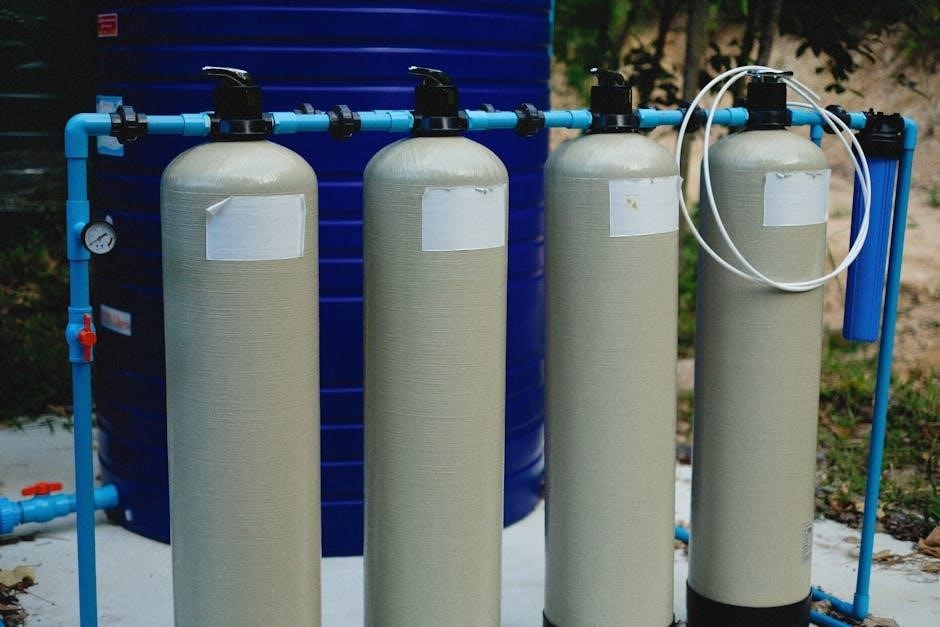
Parts Reference
The Bestway Sand Filter Pump includes essential components like the pump, sand filter tank, control valve, hoses, adapters, and strainer. These parts ensure proper assembly and operation.
2.1 Components of the Sand Filter System
The Bestway Sand Filter System includes a durable filter tank, high-capacity silica sand, a powerful pump, multi-function control valve, hoses, adapters, and a strainer basket. The filter tank houses the sand, which traps contaminants, while the pump circulates water through the system. The control valve allows for backwashing, rinsing, and normal filtration modes. Hoses and adapters connect the pump to the pool, ensuring proper water flow. The strainer basket catches larger debris, protecting the pump and extending its lifespan. Together, these components work seamlessly to maintain clean and safe pool water.
2.2 Identifying Key Parts and Their Functions
The sand filter system includes several essential components, each serving a specific role. The filter tank holds the silica sand, which traps impurities during filtration. The pump circulates water through the system, while the control valve regulates water flow and enables functions like backwashing. Hoses and adapters connect the pump to the pool, ensuring proper water circulation. The strainer basket catches large debris before it enters the pump, protecting it from damage. Understanding these parts and their roles is crucial for proper assembly, operation, and maintenance of the Bestway Sand Filter Pump system.

Installation and Assembly
Pour water into the bottom tank to submerge the skimmer, then add pool-grade sand. Connect hoses to the pump and pool, ensuring the control valve is set correctly.
3.1 Step-by-Step Sand Filter Assembly
Begin by preparing the sand filter tank. Pour water into the bottom tank to submerge the skimmer. Next, add pool-grade sand (20 silica sand, 0.45-0.85mm) to the tank, ensuring the sand level reaches the recommended 18 kg capacity. Connect the hoses to the appropriate ports, ensuring secure connections. Finally, attach the control valve and set it to the correct position for operation. Refer to the manual for specific port assignments and assembly diagrams to ensure proper installation. This step-by-step process ensures the sand filter is correctly assembled and ready for operation.
3.2 Connecting Hoses and Adapters
Connect the hoses to the designated ports on the sand filter and pool. Ensure Port A (pump inlet) and Port D (waste outlet) are securely attached. Remove the pool’s stopper and connect the hose adapter to Port B. Before starting the pump, open the strainer cover to purge any residual air. Double-check all connections to prevent leaks. Properly securing the hoses and adapters ensures efficient water circulation and filtration. Follow the manual’s port labeling to avoid incorrect connections, which could hinder performance or cause damage to the system.

Operating the Pump
Plug in and run the sand filter for 3-5 minutes until water is clear; Use the control valve for backwash, rinse, and normal filtration modes to maintain optimal performance.
4.1 Initial Startup Instructions
Before starting the pump, ensure all connections are secure and the sand filter is properly assembled. Plug in the pump and allow it to run for 3-5 minutes to clear any debris. Switch off the pump and set the control valve to the “Rinse” function. Turn the pump back on and rinse for 1 minute to circulate water backwards through the filter. This process ensures the sand bed is clean and water flows clearly. After rinsing, set the control valve to “Filter” mode for normal operation. Always follow these steps to ensure optimal performance and longevity of the system.
4.2 Daily Operation and Control Valve Functions
Daily operation begins with setting the control valve to “Filter” mode for normal operation. The valve directs water through the sand bed, trapping impurities. For maintenance, switch to “Backwash” to reverse water flow, cleaning the sand. Use “Rinse” to flush debris after backwashing. Always monitor the pressure gauge; high pressure indicates the need for backwashing. Regularly check and clean the strainer basket to ensure optimal flow; Refer to the manual for specific valve functions and operation sequences. Proper use of the control valve ensures efficient filtration and extends the lifespan of the pump and sand filter system.

Maintenance and Care
Regular maintenance ensures optimal performance. Backwash the sand filter periodically to remove debris and rinse thoroughly. Clean the strainer basket and replace sand as needed to maintain efficiency and water clarity.
5.1 Backwashing and Rinsing Procedures
To maintain the Bestway Sand Filter Pump’s efficiency, perform backwashing and rinsing regularly. Start by plugging in the pump and running it for 3-5 minutes until the water flows clear. Switch the control valve to the “Rinse” function and operate for 1 minute to circulate water backwards through the sand bed, draining through Port D. Turn off the pump and repeat if necessary. Regular backwashing prevents debris buildup and ensures clean water circulation. This process should be done every 1-2 weeks, depending on pool usage and water clarity. Always follow manual instructions for optimal results.
5.2 Cleaning the Strainer and Replacing Sand
Regularly clean the strainer to ensure optimal performance. Disconnect the hoses and drain the tank before accessing the strainer. Rinse it thoroughly with a garden hose to remove debris. For sand replacement, drain the tank completely and remove the old sand. Refill with pool-grade sand (0.45-0.85mm) or Flowclear Polysphere, ensuring the recommended capacity. Reassemble carefully and check for leaks. Note: Never operate the pump without sand or Polysphere, as this can damage the system. Cleaning and sand replacement should be done every 3-6 months, depending on usage. Always refer to the manual for specific guidelines.
Safety Guidelines
Ensure the pump is unplugged before maintenance to avoid injury. Keep the area dry to prevent electrical hazards. Do not use with permanently installed pools. Regular inspections are crucial for safe operation.
6.1 Precautions Before Maintenance
Before performing any maintenance, ensure the pump is unplugged from the power source to avoid electrical shock or injury. Always disconnect the power supply before opening the strainer or accessing internal components. Wear protective gloves and eyewear to prevent accidents. Never perform maintenance while the pump is operational or under pressure. Ensure the system is depressurized by turning off the control valve and releasing any residual water. Avoid exposing electrical parts to water during maintenance. Keep children and pets away from the area. Follow all safety guidelines outlined in the manual to ensure safe and effective maintenance procedures.
6.2 Electrical Safety Tips
Always ensure the pump is unplugged from the power source before performing any maintenance or repairs to prevent electrical shock. Keep the electrical components dry and avoid exposing them to water. Use a Ground Fault Circuit Interrupter (GFCI) outlet to enhance safety. Never touch electrical parts with wet hands or while standing in water. Avoid modifying the pump’s electrical system, as this can lead to hazards. Regularly inspect the power cord and connections for damage or wear. If unsure about any electrical aspect, consult a qualified professional. Keep the area around the pump clear of debris and water to ensure safe operation.
Troubleshooting Common Issues
Check for clogged strainers or dirty sand if the pump loses pressure. Ensure proper backwashing and rinsing to maintain optimal flow and filtration efficiency.
7.1 Diagnosing Pump Problems
Start by identifying common issues like low water pressure or the pump not turning on. Check if the strainer is clogged or if the sand filter is dirty. Ensure the power supply is stable and the pump is properly plugged in. If the pump runs but doesn’t prime, inspect the hoses for air leaks or blockages. Verify that the control valve is in the correct position and that the pump basket is clean. For persistent issues, consult the manual or contact a professional to avoid further damage to the system.
7.2 Resolving Filter Malfunctions
If the filter malfunctions, start by backwashing the sand bed to remove trapped debris. Ensure the control valve is set to the backwash position and run the pump for 1-2 minutes. If flow remains low, clean the strainer basket and check for clogged hoses. Verify that the sand level is adequate and not exceeding the recommended capacity. Replace the sand if it’s worn out or contaminated. For persistent issues, rinse the filter thoroughly or replace the sand entirely. Always refer to the manual for specific guidance, and contact customer support if problems persist. Regular maintenance is key to optimal performance.